Few days ago, I wanted to build a static website with simple SCSS and ES6 which I can host somewhere. So I decided to setup a simple project which can convert my SCSS to CSS and ES6+ code to ES5. I decided to use Webpack 4. This article is based on this learning. Code base for this article can be found in my Github.
Topics
- Introduction
- Terminology
- Prerequisite
- Environment Setup
- Config file
- Working with HTML
- Webpack dev server
- Working with ES6+ and Typescript
- Working with SCSS and CSS
- Loading static resources
- Environment specific configurations and deployment
Make sure you’ve completed the basic setup at Webpack 4 Template - Setup and Webpack 4 Template - Customizations.
Working with ES6+ and Typescript
So with our dev server running now we will move to transpile our ES6+ code and Typescript to ES5 because majority of browsers can only understand ES5.
Transpile ES6+ to ES5
For this we need a loader, so we need babel-loader @babel/core @babel/preset-env loader.
npm i -D webpack-cli
npm i babel-loader @babel/core @babel/preset-env -D
Now update your config file to include babel
...
module.exports = {
    ......module: {
        rules: [{
            test: [/.js$/],
            exclude: /(node_modules)/,
            use: {
                loader: 'babel-loader',
                options: {
                    presets: [
                        '@babel/preset-env'
                    ]
                }
            }
        }]
    },
    ......
}
So what does this basically mean? We can write different rules to load modules inside module .test is basically a regex.test: [/.js$/] here we are saying that match all the files which ends with .js and exclude node_modules.babel-loader will actually transpile these modules/files to ES 5 using preset-env.
So it is time to test that this rule is actually doing something. For this we will add header.js in src/app folder and add a ES 6 code.
export class Header {
  constructor() {
    console.log(`This is header constructor`);
  }

  getFirstHeading() {
    return `Webpack Starter page`;
  }
}
Now we need to import this to our index.js file.
import { Header } from "./app/header";
let header = new Header();
let firstHeading = header.getFirstHeading();
console.log(firstHeading);
console.log("This is JS code");
We are simply importing the header and making and object and calling its getFistHeading method. Run npm start and open http://localhost:8080 in browser to see the logs in the developer console.
Compile Typescript to ES 5
So everything is working as expected. Let’s move to compiling our typescript to ES5. For this we just need to install dependency and change the existing rule. First thing first, install the dependency
npm i @babel/preset-typescript typescript -D
We change the rule we have just written for ES 6 conversion:
module: {
  rules: [
    {
      test: [/.js$|.ts$/],
      exclude: /(node_modules)/,
      use: {
        loader: "babel-loader",
        options: {
          presets: ["@babel/preset-env", "@babel/typescript"],
        },
      },
    },
  ];
}
We also need to add a tsconfig.json file in root directory.
{
  "compilerOptions": {
    "target": "esnext",
    "moduleResolution": "node",
    "allowJs": true,
    "noEmit": true,
    "strict": true,
    "isolatedModules": true,
    "esModuleInterop": true,
    "baseUrl": "."
  },
  "include": ["src/**/*"],
  "exclude": ["node_modules", "**/*.spec.ts"]
}
And that’s it. It is ready to test. We will test it same way we tested Header.
We will create a file footer.ts in src/app/ and add following content:
export class Footer {
  footertext: string;
  constructor() {
    console.log(`This is Footer constructor`);
    this.footertext = `Demo for webpack 4 set up`;
  }
  getFooterText(): string {
    return this.footertext;
  }
}
We need to import it in index.js as we did with header.js module
import { Header } from "./app/header";
import { Footer } from "./app/footer";
let header = new Header();
let firstHeading = header.getFirstHeading();
console.log(firstHeading);
let footer = new Footer();
let footerText = footer.getFooterText();
console.log(footerText);
Now run npm run start command to see the output in the console.

Working with SCSS and CSS
CSS
For loading the CSS styles we need css-loader and style-loader loaders.
css-loader take all the styles referenced in our application and convert it into string.
style-loader take this string as input and put them inside style tag in index.html file.
npm i css-loader style-loader -D
We need to write a rule that match all .css extensions and use these loaders to load them in index.html file.
module: {
    ......rules: [
            ..... {
                test: [/.css$/],
                use: [
                    'style-loader',
                    'css-loader'
                ]
            }
        ]
        ......
}
Now create a style.css file inside src folder and and put some styles in it.
h3 {
  color: red;
}
Now we need to import style.css into index.js and put following code in index.js file.
import "../src/style.css";
Now stop the dev server and run it again npm start .
Navigate to http://localhost:8080 URL.
You can see your h3 to be red and if you inspect the DOM you will find a style tag added there with your styles in it.
Convert SCSS to CSS
For this we need two dependencies to be added that is node-sass and sass-loader .sass-loader simply convert your .scss files to .css using node-sass bindings.
npm i node-sass sass-loader -D
We need to change our rule to match a .scss file:
module: {
    ......
    rules: [
            ..... {
                test: [/.css$|.scss$/],
                use: [
                    'style-loader',
                    'css-loader',
                    'sass-loader'
                ]
            }
        ]
        ......
}
Always remember order in which loaders are being loaded matters. So do not change the order.
Let’s create folder structure for our scss files. So create src/styles/scss directory and main.scss file in it and this code:
$h3-bg-color: tan;

h3 {
  background-color: $h3-bg-color;
}
Now import in into index.js file
import "./styles/scss/main.scss";
Now you can run the code and check the results in your browser.

Extract all styles into a single file
Sometimes we do not want to add the styles in inline style tag rather we want it into a separate style file. For this we have mini-css-extract-plugin plugin.
npm i mini-css-extract-plugin -D
We need to update our webpack.config.js file as usual.
....
const MiniCssExtractPlugin = require('mini-css-extract-plugin');

....
module.exports = {
    .......module: {
        rules: [......{
            test: [/.css$|.scss$/],
            use: [MiniCssExtractPlugin.loader, 'css-loader', 'sass-loader']
        }]
    },
    plugins: [
        .........new MiniCssExtractPlugin({
            filename: 'style.css'
        })
    ]
}

Loading static resources
For loading static content we need file-loader loader.
npm i file-loader -D
rules: {
    .... {
        test: /\.(png|jpg|gif|svg)$/,
        use: [{
            loader: 'file-loader',
            options: {
                name: '[name].[ext]',
                outputPath: 'assets/images'
            }
        }]
    }
    .....
}
Now create a directory src/assets/images and put an image in it. You can download the image from here.
Now we need to import it inside our index.js file.
Let’s create a img tag in index.html file. We will set src attribute from javascript file. Add following code into index.html body tag:
<!DOCTYPE html>
<html>
  <head>
    <meta charset="utf-8" />
    <meta http-equiv="X-UA-Compatible" content="IE=edge" />
    <title><%= htmlWebpackPlugin.options.title %></title>
    <meta name="viewport" content="width=device-width,initial- scale=1" />
  </head>

  <body>
    <img id="logo" alt="logo" />
    <h3>Welcome to Webpack 4 Template</h3>
  </body>
</html>
Now add this code to your JS file:
import { Header } from "./app/header";
import { Footer } from "./app/footer";
import "../src/style.css";
import "./styles/main.scss";
import logo from "./assets/images/logo.png";
let header = new Header();
let firstHeading = header.getFirstHeading();
console.log(firstHeading);
let footer = new Footer();
let footerText = footer.getFooterText();
console.log(footerText);
document.getElementById("logo").setAttribute("src", logo);
Now if you run your site and see the page you can see the image embedded there.

You might be wondering why I did not add src of img directly into the html? Why did I add it through JavaScript? Actually file-loader only load those assets which are referenced into our modules (in JavaScript or Typescript files).
So to overcome this issue we need plugin called copy-webpack-plugin. This will copy our static assets to the folder we specify.
npm i copy-webpack-plugin -D
Also update the config to include the plugin:
....
const CopyWebpackPlugin = require('copy-webpack-plugin');
......
module.exports = {
        .....
        plugins: [{
                new CopyWebpackPlugin([{
                    from: './src/assets/images',
                    to: 'assets/images'
                }])
            }
            .....
        }
Environment specific configurations and deployment
When we prepare our assets and files for final deployment we need to keep our bundle size as less as possible. For this reason we need to minify our css and Javascript files. We can do that with one single config but it is good practice to divide config file into different files so that there will be clear separation of responsibilities. Due to this is reason its is common practice to have following files:
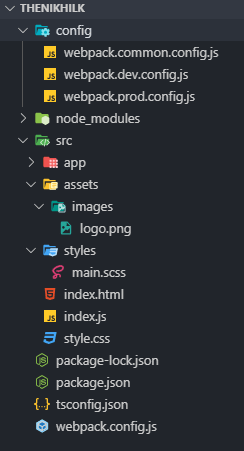
- webpack.common.config.js
- webpack.dev.config.js
- webpack.prod.config.js
As the name suggest, common file will have all the common configs. We will use webpack-merge library to merge common config to dev and prod configurations. So let’s install webpack-merge.
npm i webpack-merge -D
Now we will create a config directory in our root folder and create above mentioned files inside it.

We will copy all content of webpack.config.js file to webpack.common.config.js file.
Update the output of webpack.common.config.js file as follows: (dist is changed to ../dist)
Now we will put following code to webpack.dev.config.js file:
const merge = require("webpack-merge");
const webpackBaseConfig = require("./webpack.common.config.js");
module.exports = merge(webpackBaseConfig, {});
Delete content of webpack.config.js and put following code:
const environment = (process.env.NODE_ENV || "development").trim();
if (environment === "development") {
  module.exports = require("./config/webpack.dev.config.js");
} else {
  module.exports = require("./config/webpack.prod.config.js");
}
This code is basically saying that if the NODE_ENV is development then use webpack.dev.config.js else webpack.prod.config.js By default it will take development.
Set environment variable
To set the environment variable for dev and prod we need cross-env package. This npm package insures that environment variable is set properly in every platform.
npm i cross-env -D
Now change the npm scripts in package.json file:
"scripts": {
    "build:dev": "cross-env NODE_ENV=development webpack --mode development",
    "build:prod": "cross-env NODE_ENV=production webpack --mode production",
    "start": "webpack-dev-server --mode development"
  },
Clearing Dist folder via plugin
You might have noticed that I ask you to manually delete the dist folder whenever I run build commands. We can overcome this by using clean-webpack-plugin plugin.
npm i clean-webpack-plugin -D
We need to modify our common config:
const {
    CleanWebpackPlugin
} = require('clean-webpack-plugin');

module.exports = {
    ....
    plugins: [
        ....
        new CleanWebpackPlugin().....
    ]
}
We will proceed to prod configuration in a bit. Let’s test dev configuration first.
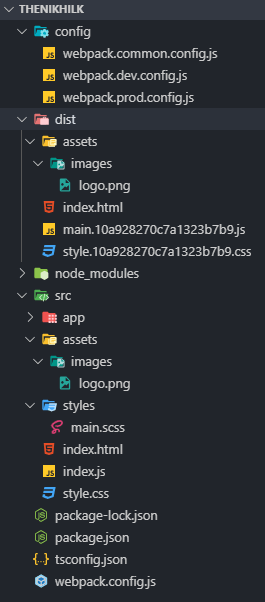
Now run npm run build:dev command. You can see dist folder is generated with all the assets required.
Prepare resources for Production
For minifying the Javascript we need a plugin called uglifyjs-webpack-plugin and for css optimization we need another plugin called optimize-css-assets-webpack-plugin respectively.
npm i uglifyjs-webpack-plugin -D
npm i optimize-css-assets-webpack-plugin -D
After installing this update the webpack.prod.config.js file:
const merge = require("webpack-merge");
const UglifyJsPlugin = require("uglifyjs-webpack-plugin");
const OptimizeCSSAssetsPlugin = require("optimize-css-assets-webpack-plugin");
const webpackBaseConfig = require("./webpack.common.config.js");
module.exports = merge(webpackBaseConfig, {
  optimization: {
    minimizer: [new UglifyJsPlugin(), new OptimizeCSSAssetsPlugin()],
  },
});
Now everything is done you can generate the build for prod via npm run build:prod command
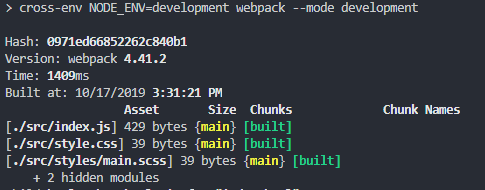
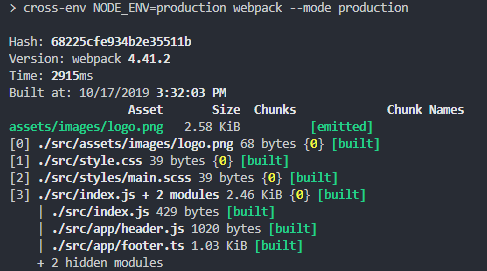
You can see the difference between size of files generated in prod and dev build:
Dev:

Prod:

Size difference is very less as we do not have larger code base.
We can do one final thing that we can implement hashing while generating the build. It is very simple we just need to add [chunkhash] in output files and mini-css-extract plugin.
Update your common config as
....
module.exports = {
    ...
    output: {
        path: path.resolve(__dirname, '../dist'),
        filename: '[name].[chunkhash].js'
    }
    .....plugins: [
        ....
        new MiniCssExtractPlugin({
            filename: 'style.[chunkhash].css'
        }), ...
    ]
}
Now if you generate the build via npm run build:prod you will see a hash appended at the end of files.


